

If there's enough interest I don't mind doing it, obviously if people wanna stick to seperate threads for the occasional question well that makes sense, it was just a thought...

What you will need to build your first effect...
The Main Items that will stay with you for every build:
- Solder!
- A Soldering Iron: I bought one for £5 off ebay nearly 2 years ago and it is still goint strong, so you don't have to spend masses but do remember it is your most important tool so don't be afraid to spend more on it, just make sure it is rated to atleast 25-30W to be able to melt solder and preferably with a fairly fine tip as this will make your life easier.
- A Solder Sucker/ Pump or Desolder Braid: Not entirely essential but a useful tool for if you make a mistake or you want to remove a component.
- Wire Snips/ Strippers: You'll need these to cut wire to length (you can use nail clippers etc though as Devi does) and you'll need something to strip the plastic off the end of your length of wire.
- A Surface to work on: Preferably away from your Petrol collection and heat proof and away from any food preperation surfaces etc. and that you wont mind getting burns etc. on.
- A Digital Multi Meter: Useful for Checking Continuity, Voltages, Setting Trimmer pots to make effects function optimaly & can be handy for debugging effects, highly reccomended but you can get away without one.
- A Solder fume extractor: Handy to prevent inhaling solder fumes which can be a mild irritant and to prevent getting the smoke in your eyes, A cheap DIY alternative can be made easily http://www.thetonegod.com/tech/extract/extract.html
Wire Choice: Single Core or Stranded (Or in some cases Shielded)?
Single:
Pros - Easy to work with, Holds a circuit in place and goes where you want it, Easier to make a neater build
Cons - Very Brittle and Easily Snaps after a few too many bends
Stranded:
Pros - More wire to make a connection, Better holding, More Flexible
Cons - The extra wire could stray and ground or touch where you don't want it to, Can't be shaped.
Shielded - Used for High gain circuits or circiuts with clock bleed etc.
Solder:
Gone over many times elsewhere... Quick Summary, Lead Best & Easiest, Unleaded worse for you and the enviroment (yes I know you'd think it'd be different, look up why) but has to be used in some places to meet ROHS Standards, Silver solder - Expensive and not very special, not made entirely of silver only a small percentage, only used for complying with ROHS.
Germanium Vs. Silicon... The ongoing battle.
Germanium - Inconsistent Production lead to an effect called leakage and very varied gains (making biasing a pedal very, very difficult) but while difficult to use and difficult to find suitable ones for current use they do have the benefit of sounding closer to a tube than a silicon transistor and have a smoother/rounder cut off overall though, but can be noisy in circuits, not reccomended for begginers due to the biasing issues and selecting a suitable one.
Silicon - Generally no leakage and consitent gains, much easier to make a circuit with, suffers from having a harsher cut off though compared to germaniums (harder clipping sound) hence why people choose germaniums for a sound richer in harmonics... but they still sound good anyway and they're about 100x cheaper and 100x easier to find.
Capactiors:
The important thing with all capacitors, they must be rated above the voltage they are going to see (that's what the voltage number on them is for), prefferably 2x so if your circuit is powered by a 9V power supply you want Capacitors rated for atleast 16V.
Choice of capacitor - Some people say some types sound different or better and to some extent this may be true but to the average human ear, unless you're a stickler for tone, you're not going to notice that much difference probably, perhaps if you want a high quality build using capacitors better than ceramic could be wise, but if you cant find the right value, nothing wrong with ceramics, I use them all the time, here's an article written on the differences http://greygum.net/sbench/sbench102/caps.html
Electrolytic Capacitors - Just to mention, these have a limited life span (some as little as a 10 year shelf life), if you have an old pedal (atleast over 10 years probably 20-30) replacing them can bring it back to life and it can also be the cause of a non functioning pedal, you can look out for them being swollen or leaky as a sure sign of them being dead too.
Resistors:
Tollerance Rating -The percentage by what your resistor may be off from production, a 10% tollerance means your 100k resistor could be anything from 90k to 110k in reality, for better consitency, use better tollerances, but it's not essential at all, the tollerances do not add up throughout a circuit (10% + 10% etc.) the whole circuit will have a 10% Tollerance.
Carbon Comp Resistors (Or Mojo Vintage Tonez) - These can have drifted in value over years, for example I had one that was labelled 100k but when measured was 130k they also had worse tollerances (add the drift to that) than modern resistors which can have tollerances of only 1% Carbon Comp also tend to be noisier, while these can sound better in tube amps (due to a swelling effect which people seem to like the sound of) in pedals they don't see nearly enough voltage for this to occur... but they do look pretty.
Carbon film - Your bog standard modern resistors, do what they say on the tin, of average noise rating you could say they sound warmer in a circuit than...
Metal Film Resistors - Only 1% Tollerances, The least noisy resistors there are but can be said to sound sterile, possibly useful for high gain circuits but in a pedal.. there's nothing wrong with carbon film, your choice.
Switches, What do I want...? (switch wiring diagrams in Getting started section of links)
For your stompbox switch you want one of 2 things -
DPDT (Double pole double throw) or 3PDT (Triple pole double throw)
For just true bypass and no LED you just want a DPDT, if you have a high gain circuit or a circuit that oscillates in bypass you want to use input grounding, this will send the input to ground in bypass to help minimise the noise (you can still get bleed through)
To have an LED with your Circuit you will want a 3PDT, it has 3 extra poles that you can use to run an LED to and the ground wire for it, that simple and it can still be input grounded.
Say you want a circuit to have an indicator LED though and you can't get 3PDT switches (or they're too expensive) there is something you can do, with a quick wiring reshuffle and a simple additional circuit, you can have both! Here's the schematic of the circuit, known as the millenium bypass & a simple vero layout to build it with http://www.geofex.com/article_folders/m ... milckt.gif Vero - http://www.aronnelson.com/gallery/main. ... b.png.html
There is a circuit for a input grounded millenium bypass.. but with the extra components is probably more worth just buying a 3PDT but if you search the geofex site linked below, you can find the schematic.
Coming a board:

There are 4 main types of board - Perf/Matrix, Vero/Strip, Bread/Proto & PCB Boards (An explanation of all and how to do layouts for them http://www.beavisaudio.com/techpages/Sc ... ToReality/ )
Breadboard -
Looks like this... Used to test/design circuits, Great if you wanna try something before you commit it to a more permanent type of board

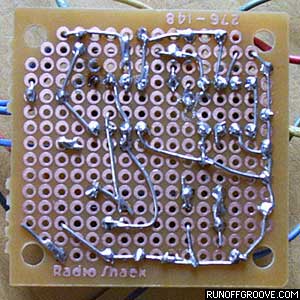
Perf/Matrix -
Looks like this... You can wire this straight up like a PCB layout or schematic, you just make the connections with wire to connect the traces
Veroboard -
Looks like this... Uses copper strips to connect the components together, you just break the trace with a drill bit/sharp knife to stop a strip, nice and simple to use and do neatly but a bit trickier to do layouts for than other mediums, plenty of layouts out there though... my favourite kind of board.

PCB -
The Most permanent type of board, used to commit your project too, easy to use just solder your components straight on and it takes care of the rest, you can DIY them if you don't mind playing with a bit of Acid or in the case of the Devi Pedals, you can buy the PCB...

A Simple Breadboard Tutorial -
http://hibp.ecse.rpi.edu/~connor/educat ... dboard.pdf
A Simple Perf Tutorial -
http://itp.nyu.edu/physcomp/Tutorials/S ... APerfBoard
A Simple Vero Tutorial -
http://www.societyofrobots.com/member_tutorials/node/90
A Simple PCB Tutorial -
http://www.basicaudio.net/How-to-make-PCBs.html
Remember when boarding that components will Short out if you run them into themselves so if you wanted to put a resistor on a strip of vero, you'd have to place it accross 2 strips, if you wanted to do it on one strip, you'd have to make a cut inbetween each leg so it didn't run in to itself.
Useful Links:
Getting Started -
http://www.beavisaudio.com/techpages/Sc ... ToReality/ - How to start reading Schematics
http://www.generalguitargadgets.com/ind ... &Itemid=27 - An introduction to your components
http://www.generalguitargadgets.com/ind ... &Itemid=27 - The Main ways to wire your effects Jack & switch up
http://www.beavisaudio.com/techpages/buildstuff/ - Getting Started
http://www.diyguitarist.com/StompboxStuff.htm - One mans experience with building put together by the excellent Paul Marossy
Schematics & PCB layouts -
http://www.tonepad.com/projects.asp?projectType=fx - A good source of Schematics and PCB layouts for popular effects
http://fuzzcentral.ssguitar.com/index.php - A place to find information, PCBs & Schematics of the most popular vintage fuzzes
http://www.geofex.com/schemata.htm - Hundreds of Schematics & PCB layouts
http://www.runoffgroove.com/articles.html - Schematics of Pedals designed & based off popular amps & more
Advanced Reading -
http://www.geofex.com/ - A site full of everything you could need to know, but it can be hard to navigate and some information can only be found by searching
http://www.thetonegod.com/tech/ - DIY designs, how to board SMD builds & Micro Controllers
http://www.basicaudio.net/How-to-make-PCBs.html - How to make PCBs from the Excellent John Lyons
Debugging your Effect -
http://www.diystompboxes.com/wiki/index ... =Debugging - Simple and Effect information on what to do when your effect wont work (Also features a really simple to make DIY audio probe that can be made from an old guitar cable, a capacitor and a crocodile clip)


")


